

How to Add Different Variant Sizes and Flavors in Shopify
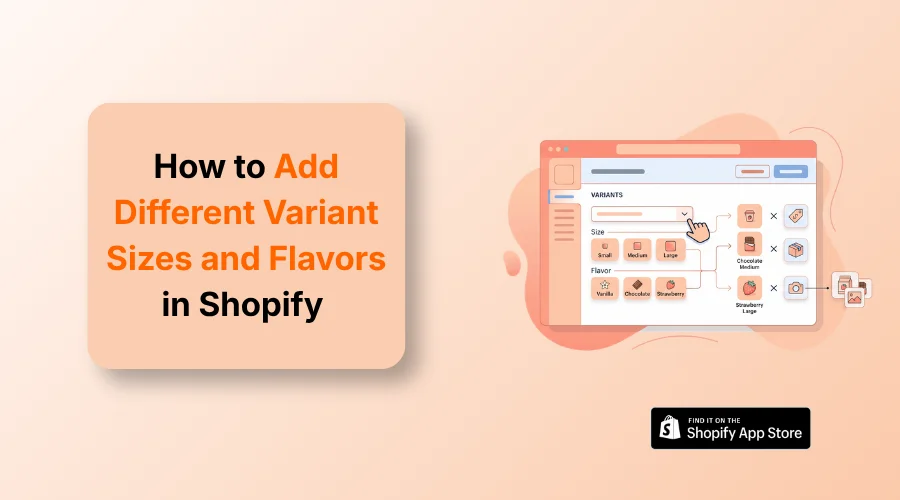
Open your product page inside the Shopify dashboard. Scroll to ‘Variants’ and click “Add options like size or color.” Enter ‘Size’ and ‘Flavor’ as your option names, then type your specific values.
Store owners waste time when product setups look messy. They ponder how to add different variant sizes and flavors in Shopify and build clean product choices.
If you can relate to them, you know that plain listings with missing size or flavor options confuse buyers and hurt store sales. And you don’t want that.
That’s why we prepared this guide, which covers basic setup steps, price changes, limit rules, image mapping, and troubleshooting fixes.
How Shopify Sizes, Flavors, and Variants Work
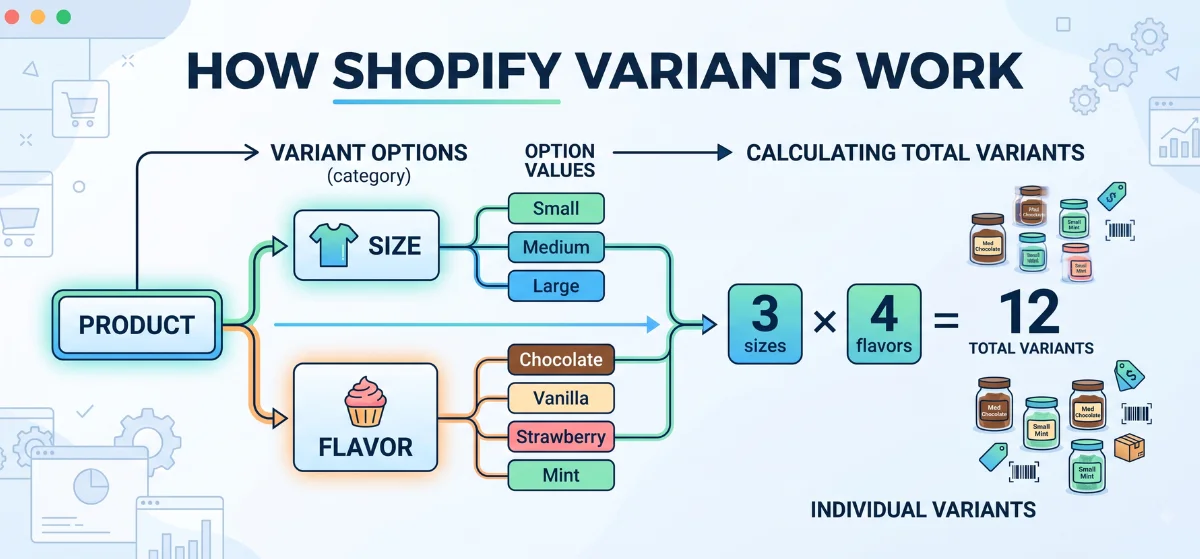
Shopify groups your product choices using three clear levels. You set options, list values, and combine them to create individual variants.
What is a Variant in Shopify?
A variant is a single purchasable item combination. Each distinct combination tracks its own price, SKU, and stock count. For instance, Medium + Chocolate equals one unique variant.
What is a Variant Option?
A variant option is the general attribute or category you offer shoppers. It defines the specific type of choice available on the product page. For example, Size or Flavor acts as your option category.
What Are Option Values?
Option values are the specific choices inside an option category. They give shoppers exact picks for that trait.
- Small
- Medium
- Large
How Shopify Calculates Variant Combinations
Shopify multiplies the number of option values together to build total items.
- 3 sizes × 4 flavors = 12 total variants
If you add a third category like color, Shopify multiplies that too. Setting up a Shopify multiple variants dropdowns layout relies on this quick math. You can easily calculate your inventory totals before building your store catalog.
How to Add Different Sizes and Flavors in Shopify
You need to follow only a few simple steps to add size and flavor options directly inside your admin dashboard. Here are those steps.
Step 1: Open the Product in Shopify Admin
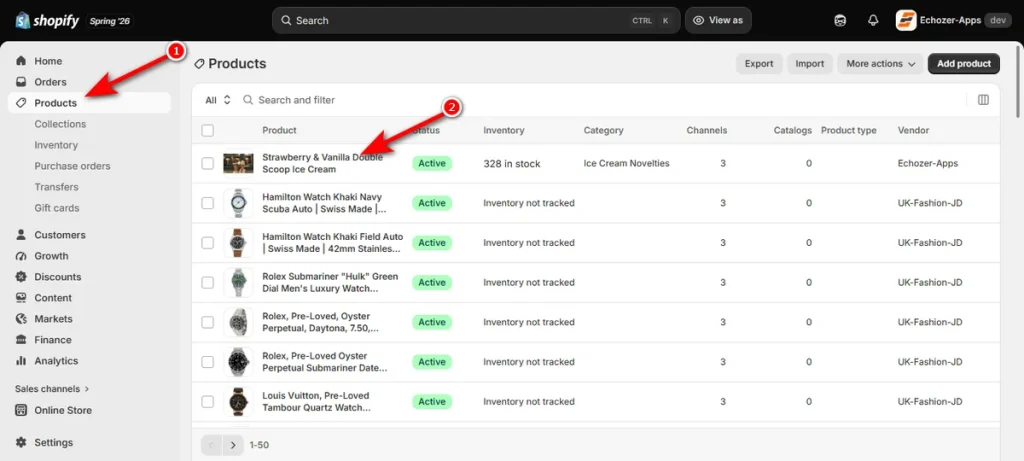
Log in to your store. Click ‘Products’ from the left navigation menu. Select the specific item you want to edit from your list.
Step 2: Add Size as the First Option
Scroll down to the ‘Variants’ section on the product page. Click “Add options like size or color.”
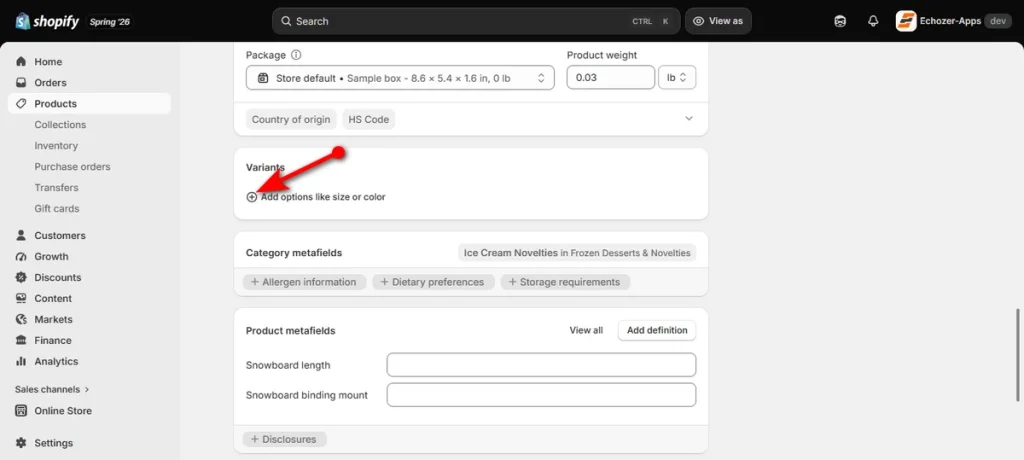
Type ‘Size’ into the “Option name” field and hit the ‘+’ icon.
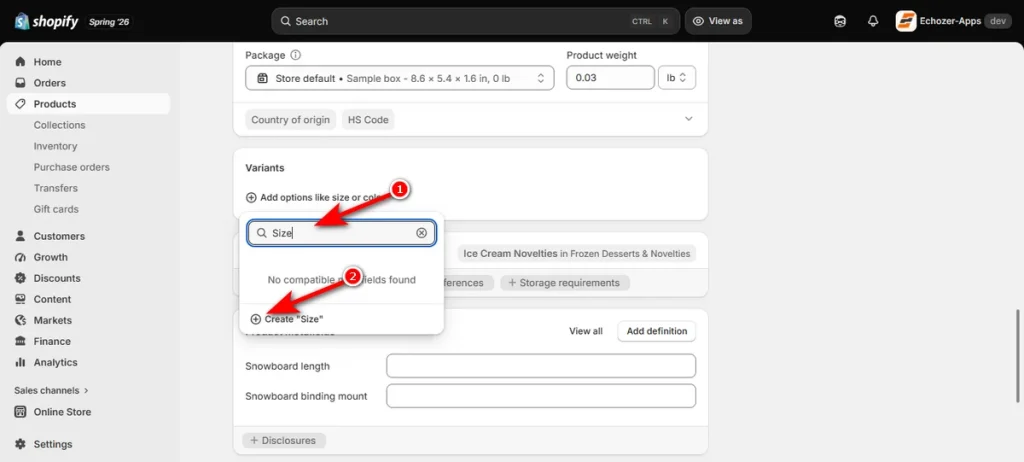
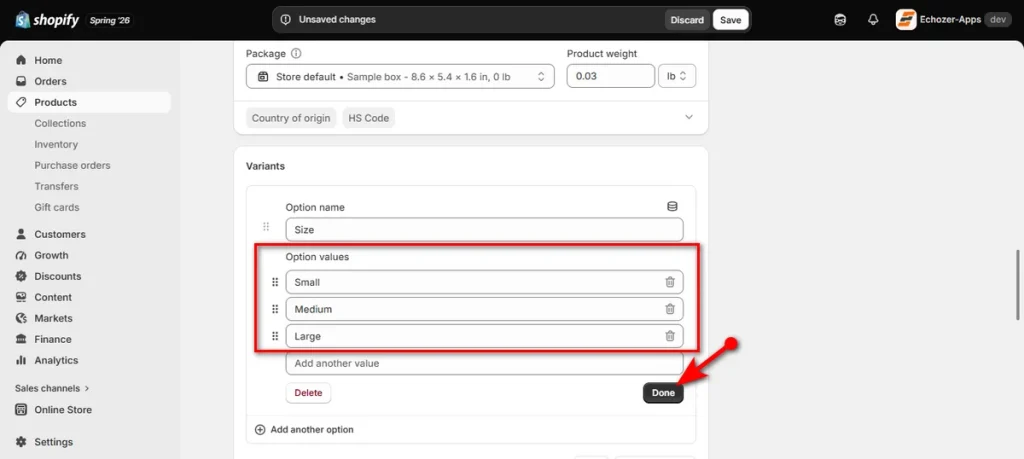
Then, enter your values in the “Option values” boxes below:
- ‘Small’
- ’Medium’
- ‘Large’
Click ‘Done’ to finalize your first option.
Step 3: Add Flavor as the Second Option
Click “Add another option” right below your saved size choices. Then, follow the exact steps you followed while creating the size option.
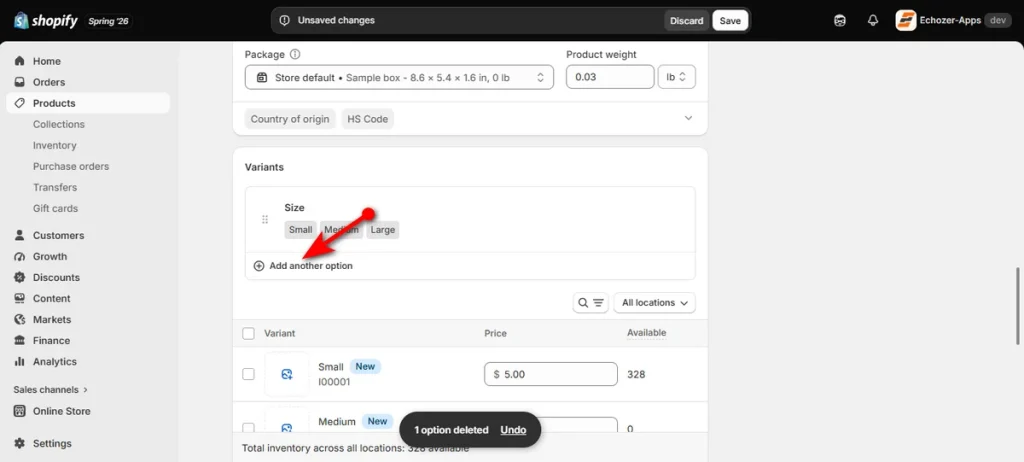
That means you need to type Flavor as the new “Option name.”
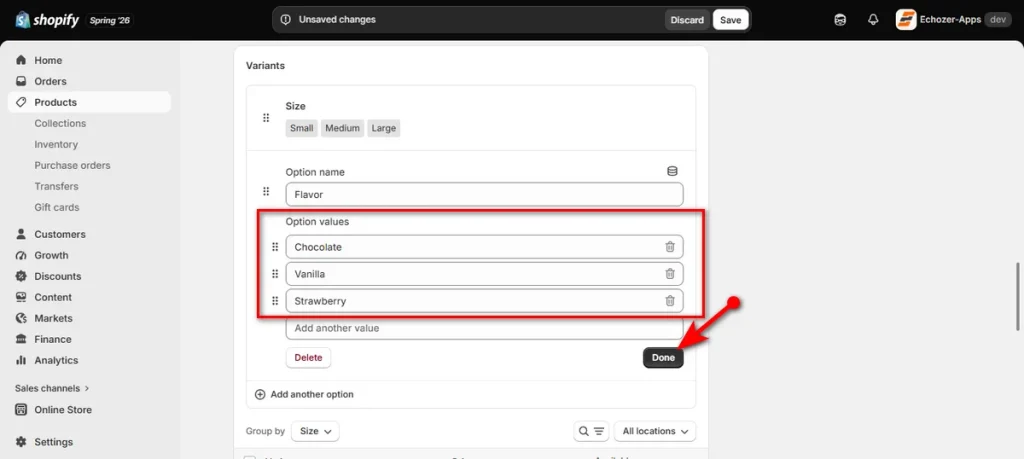
Enter your flavor choices under “Option values:”
- ‘Vanilla’
- ‘Chocolate’
- ‘Strawberry’
Click ‘Done’ after listing every flavor.
Step 4: Generate the Variants
Shopify automatically generates every possible combination based on your input. It multiplies each size by every flavor option to build distinct item pairs.
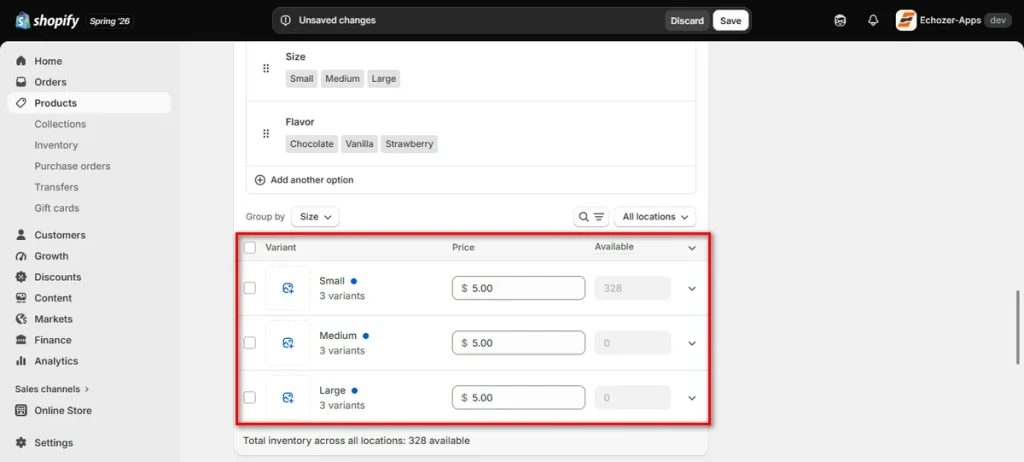
Step 5: Save the Product
Review your generated variant list at the bottom of the section. Click ‘Save’ at the top right corner of the screen to lock in your changes.
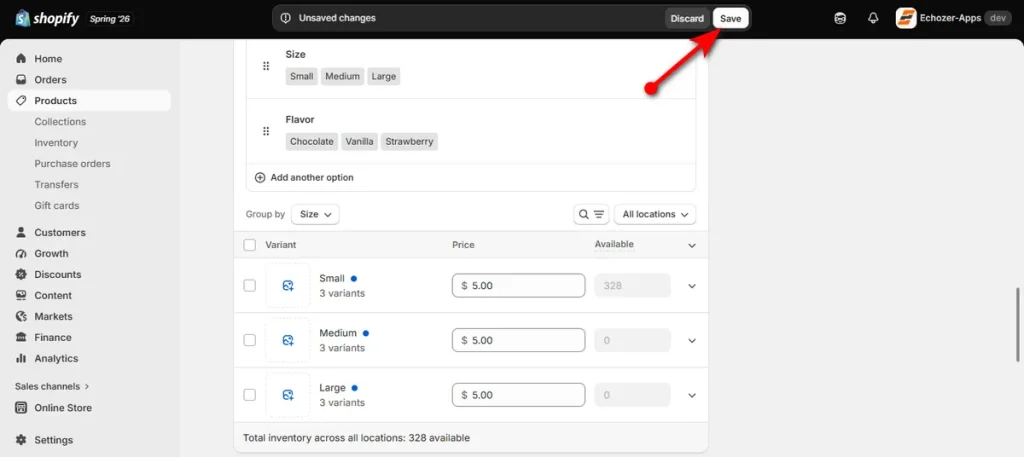
That’s how you add different variant sizes and flavors in Shopify.
How to Set Different Prices for Shopify Size and Flavor Variants
Shopify lets you assign individual price tags to every product combination.
Larger sizes or specialty ingredients often require higher rates, so learning how Shopify add variants with different prices works gives you complete control over your profit margins.
Keep learning that by following the steps below:
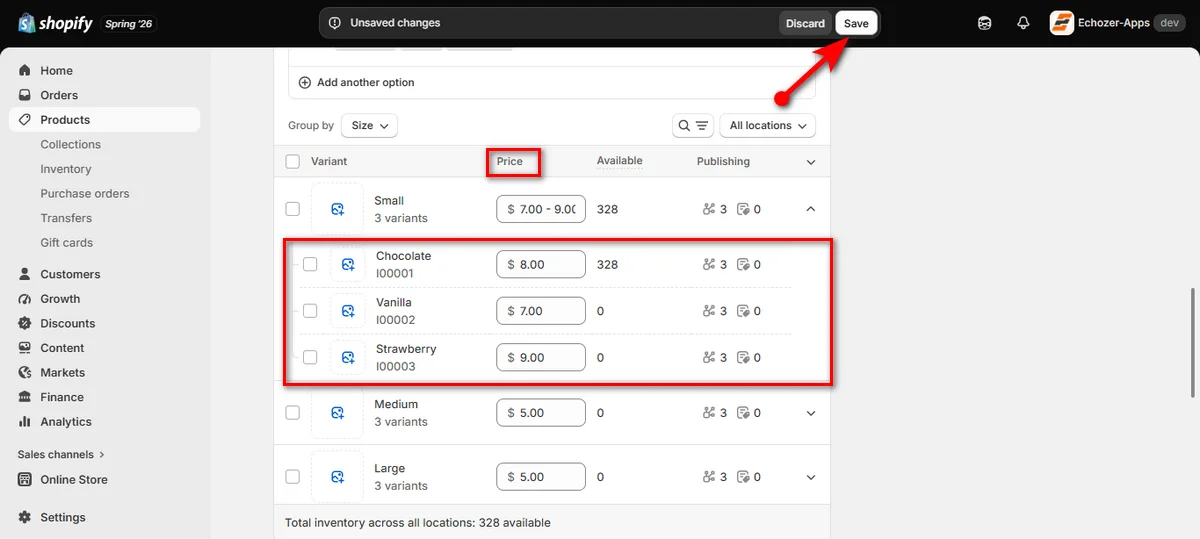
Navigate to ‘Products’ in your dashboard, select your item and open it in the product editor, and scroll down to the ‘Variants’ section.
Locate the variant group you want to edit. Click the down arrow icon on the right side of the row to view all sub-variants inside that size or flavor group.
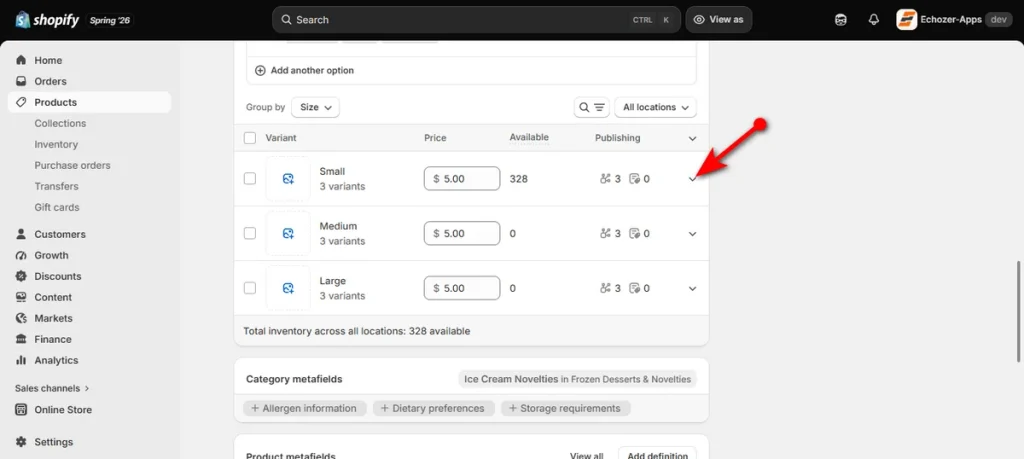
Click inside the ‘Price’ field for each individual row and type the new price.
Alongside the base price, you can also manage key details for each specific variant:
- Price: The standard selling rate for that exact combination.
- Compare-at price: The original amount to show a sale discount.
- SKU: The unique stock tracking code.
- Inventory: The current stock level across your locations.
- Barcode: The scannable UPC or ISBN string.
- Weight: The physical mass used to calculate shipping fees.
Click ‘Save’ in the top right corner once you finish updating your prices.
How to Add Images to Shopify Size and Flavor Variants
Follow the steps below to add images to Shopify size and flavor variants.
- Step 1: Open ‘Products’ in your admin area. Select your item and scroll to ‘Variants.’
Then, find your variant group and click the down arrow on the right.
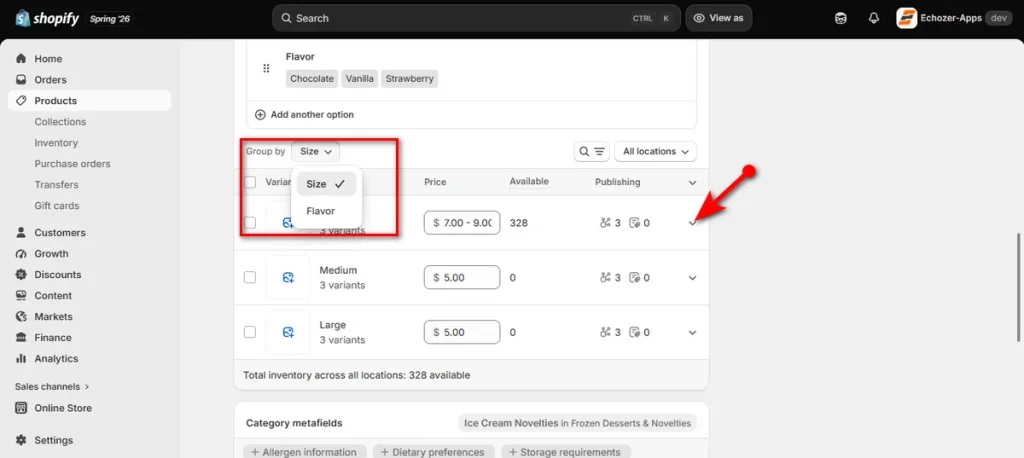
- Step 2: Click the thumbnail box next to a variant name.
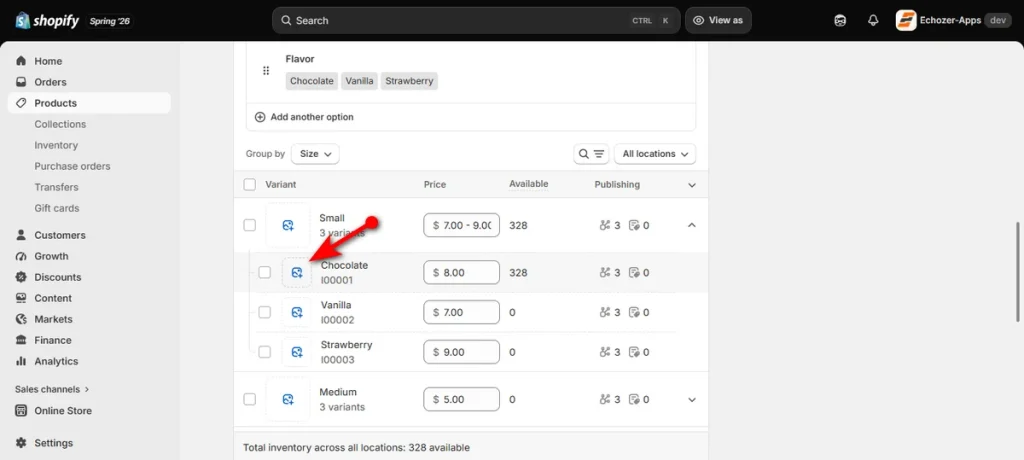
- Step 3: Click “Add files” for new uploads, or select an existing photo. Hit ‘Done.’
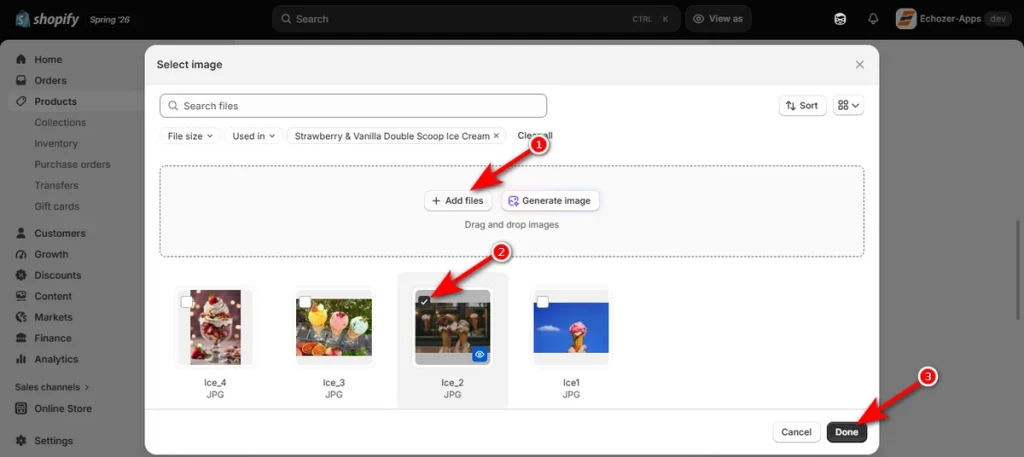
- Step 4: Press ‘Save’ in the top right corner.
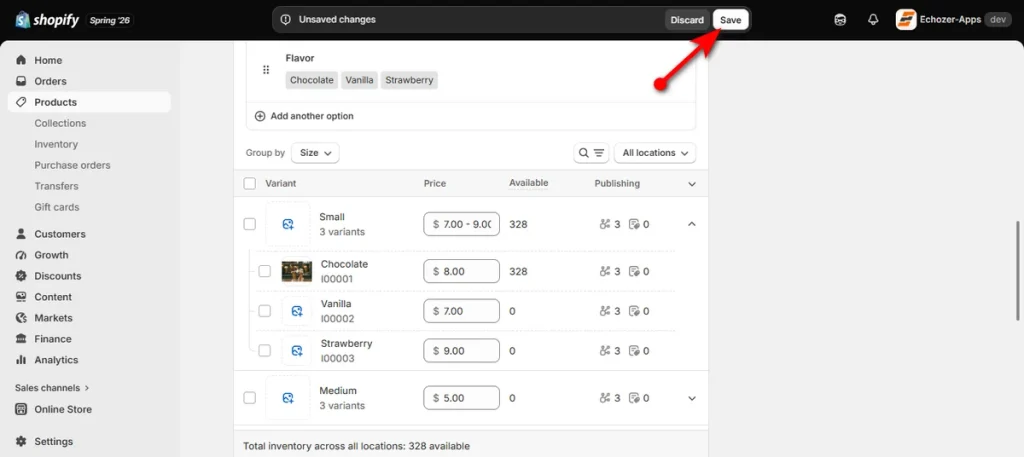
This manual process works fine for small catalogs. However, stores with dozens of flavor options quickly hit a wall.
You need to spend hours and may make costly mistakes if you want to add hundreds of images one by one.
So, what’s the solution? You need to use an app that automates this process.
Echo Swatch uses AI to detect and assign relevant variant images instantly. It handles multiple variant options automatically, so you never have to match photos by hand again.
How to Automatically Assign Variant Images in Shopify With Echo Swatch
As you know, manual image mapping wastes hours of setup time. Echo Swatch speeds up your workflow by mapping media automatically.
So, install Echo Swatch from the Shopify App Store to connect it to your store catalog.
Select Your Target Product
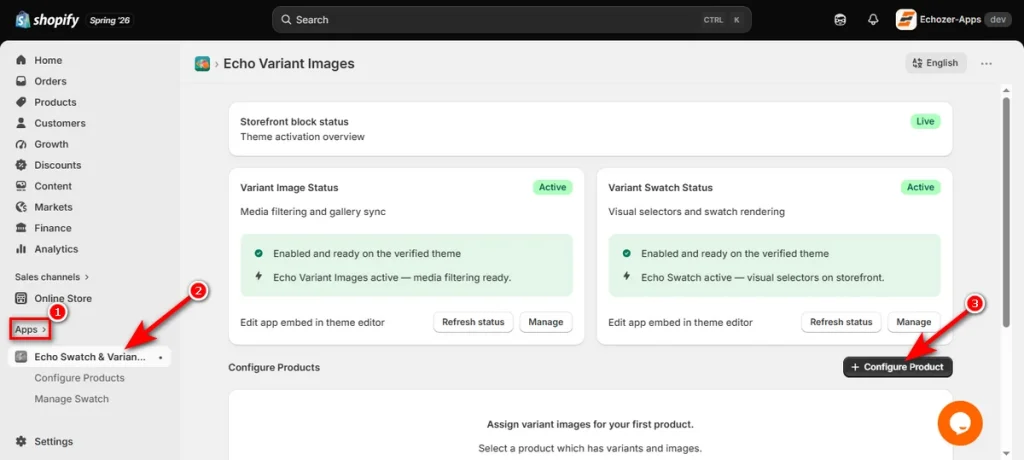
Open Echo Swatch from your ‘Apps’ list. Click the “+ Configure Products” button on the left menu.
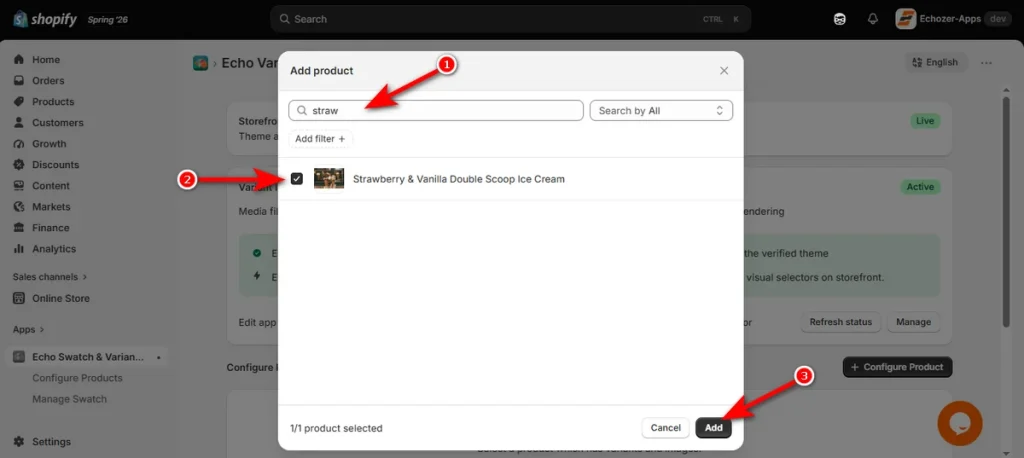
Then, search for your item in the pop-up search bar. Check the box next to your product name. Lastly, hit ‘Add’ button at the bottom right corner.
Run AI Auto-Assignment
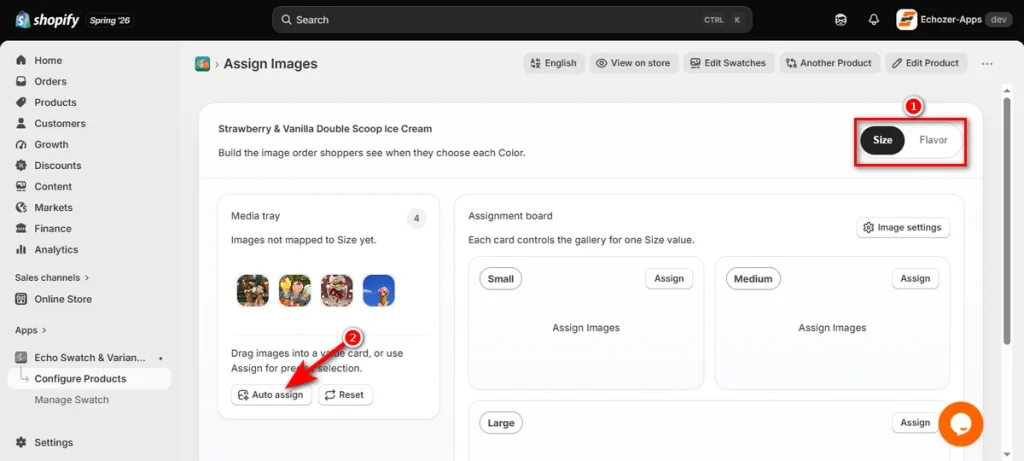
Pick your target option tab, such as ‘Size’ or ‘Flavor,’ at the top right of the dashboard.
After that, click “Auto assign” button under the “Media tray.”
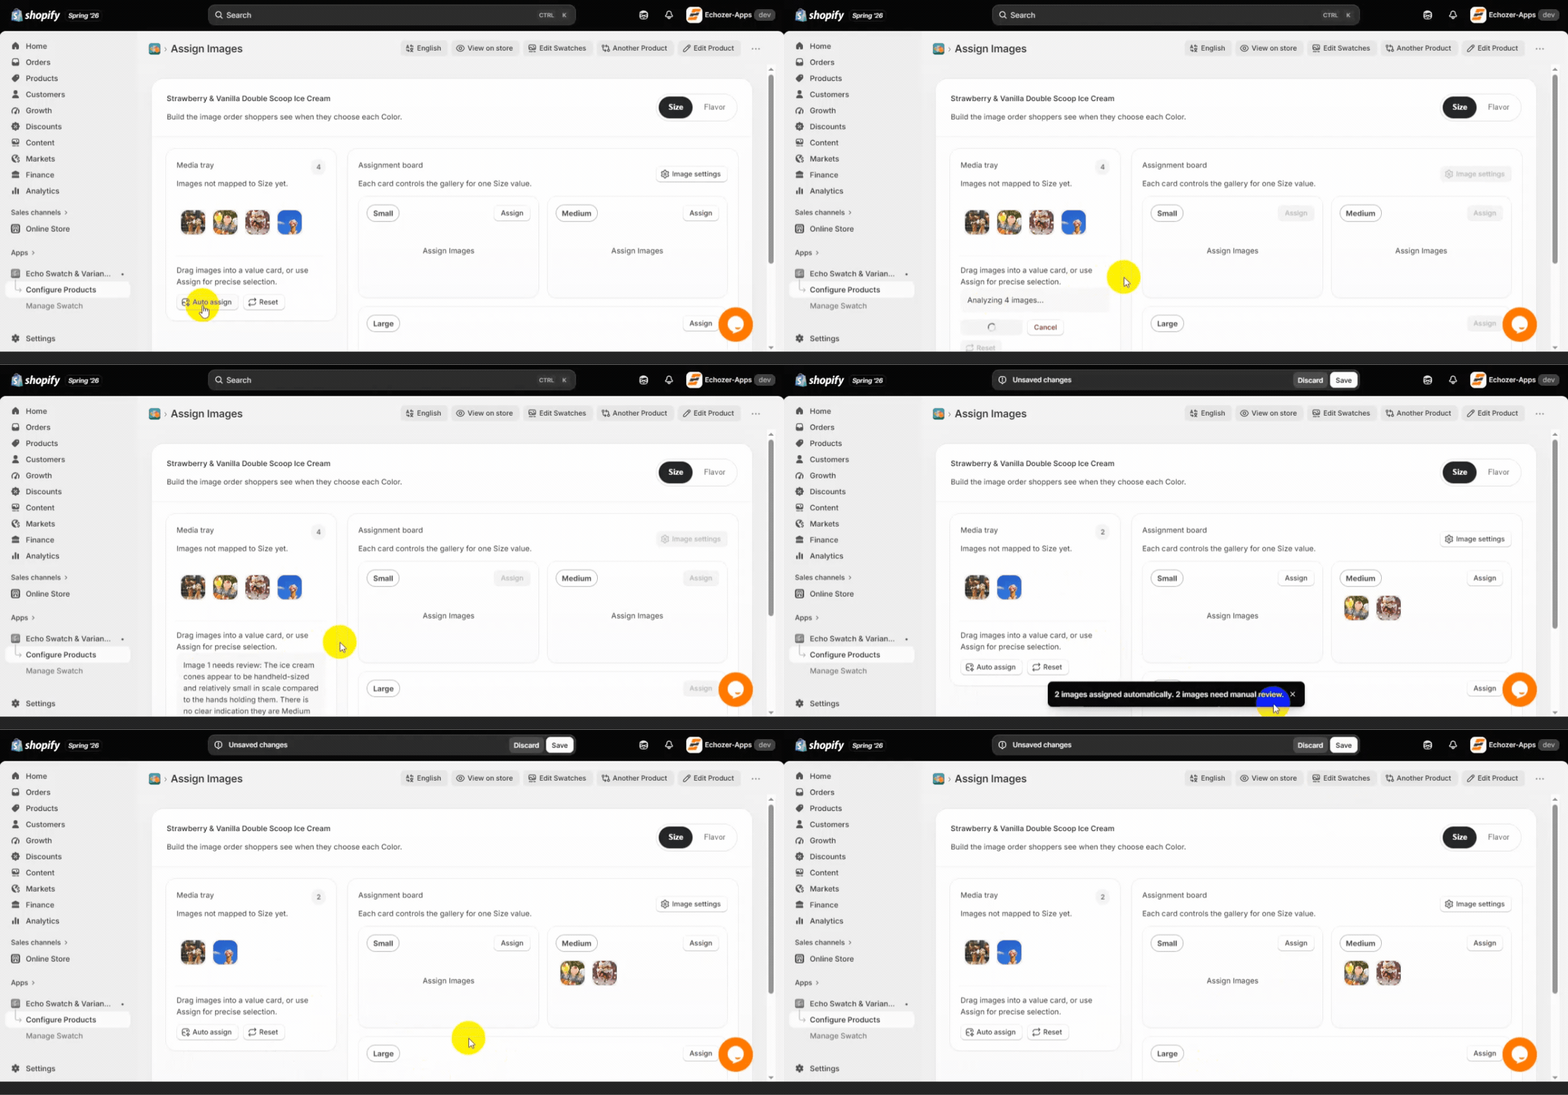
The AI scans your uploaded gallery files and matches them to your value cards automatically.
Review the Auto-Assigned Images
Check the AI assignments carefully before publishing.
AI algorithms read file details well, but human verification guarantees complete visual accuracy.
Drag any missed files from the “Media tray” directly into their correct option cards.
Save Your Assignments
Review every card on your assignment board. Tap ‘Save’ at the top right of your bar once all photos match their correct options.
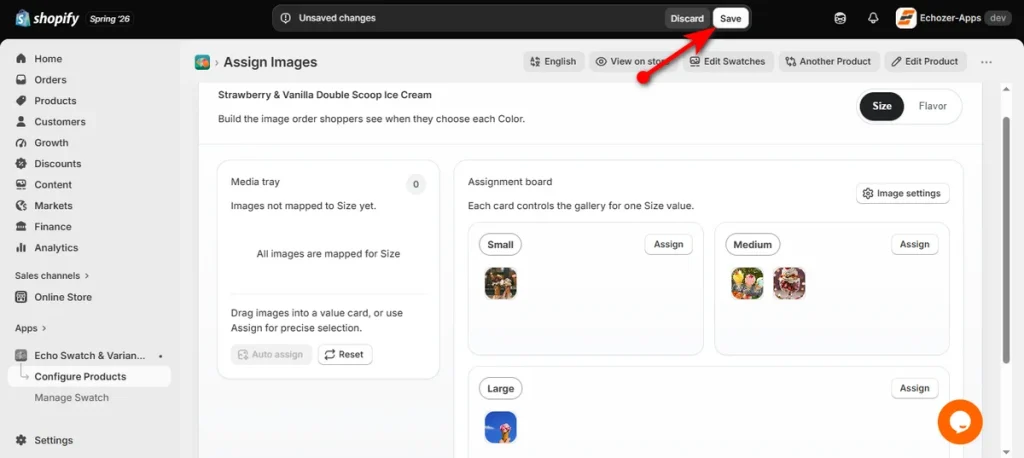
Test Storefront Combinations
Click “View on store” to check your product page.
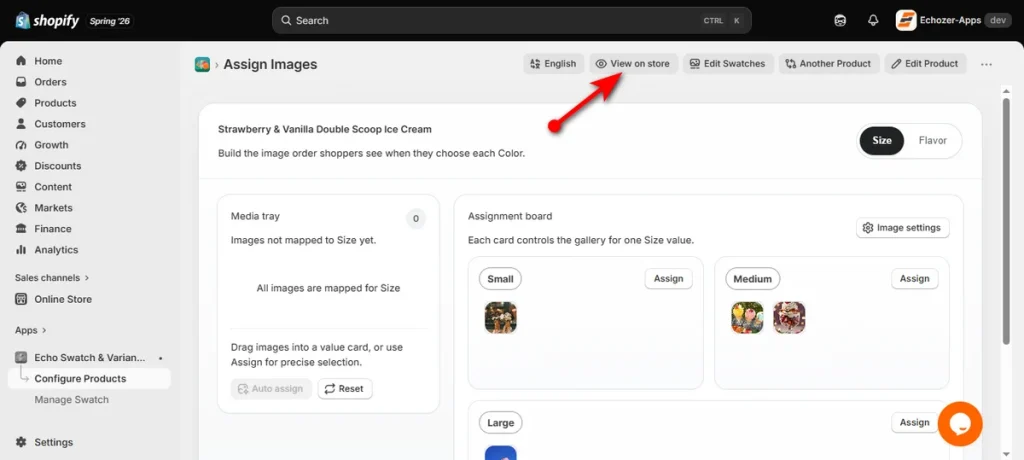
Select different option pairs to verify your setup:
- Small + Vanilla
- Medium + Chocolate
- Large + Strawberry
The main image gallery must update to reflect your chosen flavor or size. Echo Swatch displays relevant photos while hiding unrelated variant images automatically.
Shopify Variant Limits You Should Know
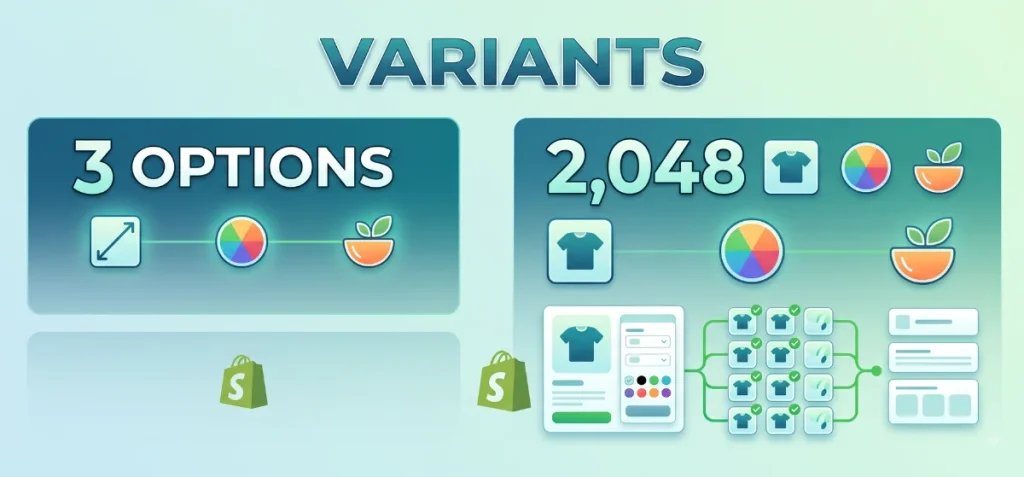
Platform rules control how many options you can list. Shopify sets clear rules for option types and total item counts.
Shopify Allows up to 3 Variant Options
You can add up to 3 option types on a single product page. For example:
- Size + Flavor + Color
Native Shopify settings block any request for a fourth category like Material.
Shopify Allows up to 2,048 Variants Per Product
Option value multiplication sets your total count. You can build up to 2,048 unique item pairs under one listing.
- 10 sizes × 10 flavors × 10 colors = 1,000 total variants
This high capacity handles big store catalogs easily.
What About the Old 100-Variant Limit?
Many older guides state that Shopify caps items at 100 combinations. That rule is old news. Modern Shopify stores support up to 2,048 variants natively. You do not need complex workarounds to bypass the old limit anymore.
Common Problems When Adding Size and Flavor Variants
Here are a few common problems many store owners face while adding variants.
Shopify isn’t Showing All Combinations
Missing variant combinations usually point to quick admin or theme settings.
- Unchecked Combinations: Scroll to the ‘Variants’ block inside your product admin. Check that every option pair was saved and not deleted by mistake.
- Out of Stock Settings: Zero stock counts hide items automatically if your store hides sold-out inventory. Update your inventory levels or enable pre-orders.
- Theme Settings: Head to Online Store > Edit theme. Open your default product page layout and ensure the “Variant Picker” block displays correctly.
The Wrong Image Appears After Selecting a Variant
Mismatched product photos confuse buyers and hurt sales conversions. Fix image display errors with these steps:
- Verify Admin Mappings: Open your product page inside the admin dashboard. Scroll down to Variants and inspect the small image thumbnail next to each row. Click the thumbnail to map the exact flavor or size photo.
- Check Theme Settings: Go to Online Store > Edit theme. Ensure your active theme allows dynamic gallery image switching when options change.
- Use Automated Image Tools: Manual image mapping breaks easily when you edit large product catalogs. Echo Swatch maps relevant media to each choice automatically, so customers always see the exact variant they select.
Size or Flavor Doesn’t Appear as a Swatch
Standard themes render swatches only for Color options. Exploring the best variant size Shopify apps helps you upgrade plain text buttons into interactive choice cards.
- Theme Metafields: Connect category metafields inside your theme editor to enable custom swatches.
- Liquid Customization: Modify Product variants Shopify Liquid code files to force custom option styling.
- Echo Swatch: Install Echo Swatch to convert Size and Flavor dropdowns into visual swatches instantly without touching code.
My Variant Prices Aren’t Changing
Static prices on the storefront often stem from theme script errors or regional pricing overrides.
- Check Price Settings: Verify each combination row in your product admin lists the correct prices.
- Inspect App Conflicts: Disable dynamic checkout or page builder apps that block price update scripts.
- Review Market Rules: Look at your Shopify Markets settings to confirm regional price rules are not locking prices.
Customers See Unrelated Product Images
Default Shopify themes keep full gallery images visible even after option selections. This clutters the page and confuses buyers.
- Default Gallery Limits: Standard theme templates stack every upload inside one main slider.
- Manual Variant Links: Native settings show attached variant images first, but leave unrelated photos below.
- Echo Swatch Solution: Echo Swatch filters out unrelated media automatically. It displays only relevant photos for your active size or flavor choice while hiding every unselected image.
Best Way to Add Size and Flavor Variants in Shopify
Your choice on how to add different variant sizes and flavors in Shopify depends on your catalog.
Use Shopify’s native variants if:
- You have simple options.
- You stay under 3 categories.
- You need no special visuals.
- You have few images.
Use Echo Swatch if:
- You manage massive image galleries.
- You want automatic photo matching.
- You need custom visual swatches.
- You want to hide unrelated media.
- Your default theme falls short.
FAQs
Can Shopify Have Different Prices for Different Variants?
Yes. Every Shopify variant holds its own unique price, inventory count, SKU, barcode, and comparison cost directly inside your admin dashboard.
Can I Have Multiple Variant Dropdowns in Shopify?
Yes. Shopify supports up to three variant options per product. Your active theme determines whether these options show as Shopify multiple variants dropdowns, buttons, or visual swatches.
How Do I Automatically Assign Images to Shopify Variants?
You can manually associate images with variants in Shopify. If you have many variant images, Echo Swatch can use AI to automatically assign relevant images to variants and can display variant-specific images and swatches.