
How to Show Automatic Discount on Product Page Shopify
Shopify’s native automatic discounts do not show discounted prices or strikethrough savings on product pages. According to Shopify’s official documentation, automatic discounts process during the cart and checkout stages. So, use a storefront discount app like Echo Bundle to display automatic discounts on the product page.
Shopify store owners often wonder how to show automatic discount on product page Shopify displays. Native automatic discounts only apply at cart and checkout, hiding your deals from browsing shoppers.
Hide your savings until checkout, and buyers abandon their carts. Missing upfront price drops confuse visitors and hurt conversion rates.
This guide breaks down four practical methods to display discounts on product pages. You will learn native workarounds, app setups, theme code tweaks, and troubleshooting fixes.
Why Shopify Automatic Discounts Don’t Show on Product Pages
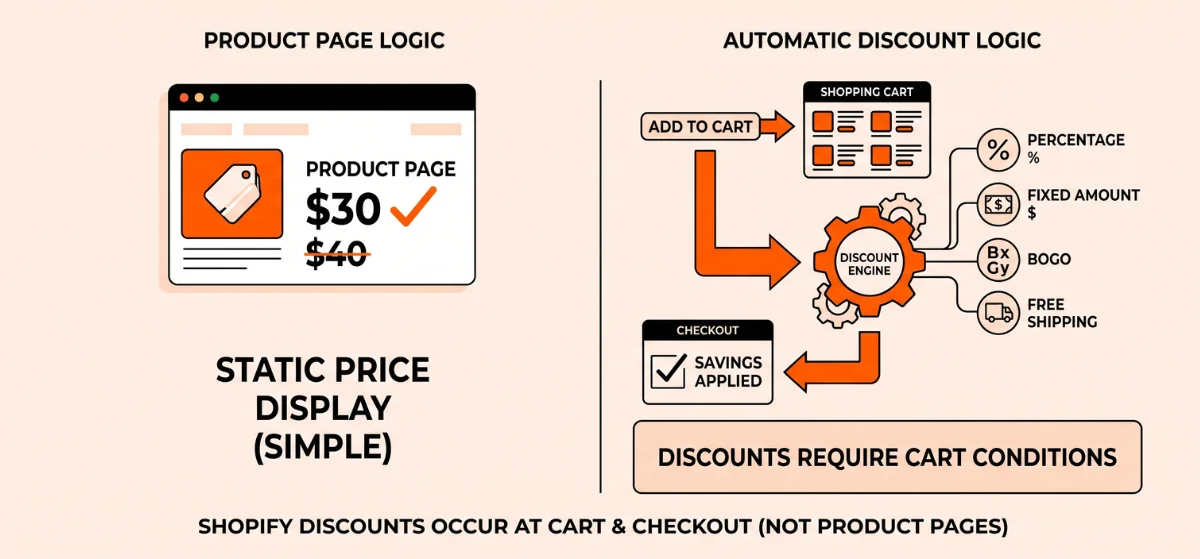
Shopify hides automatic discounts on product pages. They only trigger inside the cart and checkout.
Product Page (Static Price) ──► Cart (Rule Engine) ──► Checkout (Savings Applied)
Shopify separates product pricing from its discount engine.
Shopify Automatic Discounts
Automatic discounts need specific cart conditions. Shopify checks eligibility after a shopper adds items to the cart.
Common setups include:
- Percentage off: Save 15% on the entire cart.
- Fixed amount off: Save $10 on specific collections.
- Buy X Get Y (BOGO): Buy two items, get one free. (see our round-up of the 10 Best BOGO Shopify Apps to Increase Sales.)
- Free shipping: Spend over $50 for free delivery.
- Minimum spend rules: Spend $100 to get $20 off.
Shopify official documentation states these rules calculate at cart and checkout. A standard product page cannot guess if a buyer will meet those rules.
Shopify Compare-at Price
Compare-at Price is a simple text field. It is not an automatic discount rule.
- Price: $30
- Compare-at Price: $40
- Product page: $30 with
$40crossed out
This field edits the product price directly. It needs zero cart logic.
Why Shopify Keeps Them Separate
Automatic discounts rely on live buyer choices:
- Total item counts
- Cart dollar totals
- Mix of different products
- Customer tags
Shopify cannot predict these choices on a static product page. The engine waits for cart activity before it calculates savings.
How to Show Automatic Discount on Product Page Shopify
Pick the right method based on your display needs:
| Method | Shows Discount on Product Page? | Automatic? | Best For |
| Shopify Automatic Discount | No (not natively) | Yes | Cart and checkout deals |
| Compare-at Price | Yes | No | Simple single-item markdowns |
| Theme / Custom Code | Potentially | Depends | Bespoke developer builds |
| Discount / Bundle App | Yes | Yes (varies by app) | Dynamic storefront offers |
| Echo Bundle | Yes (supported offers) | Yes | Bundles, quantity breaks, BOGO |
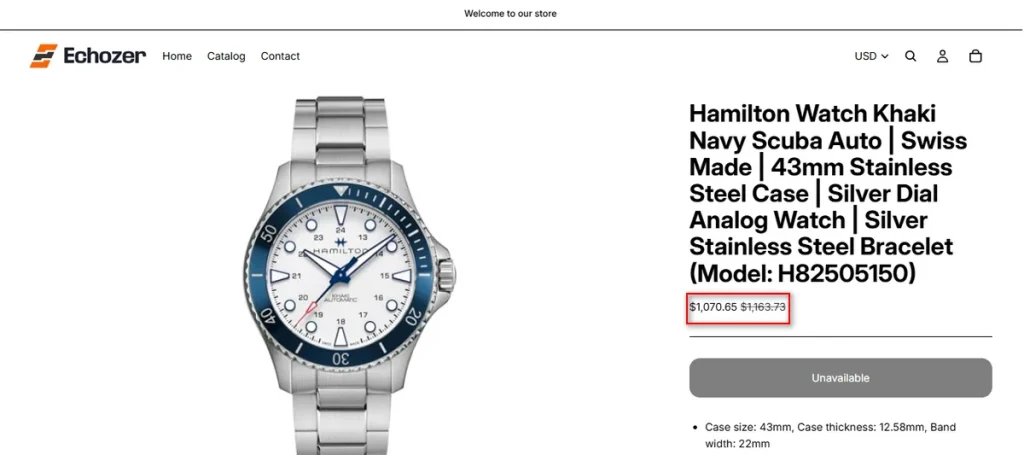
Compare-at Price changes a product’s base price tag directly. It is a static markdown, not an automatic discount rule. Use it when every buyer gets the exact same sale price without meeting cart conditions.
If you need dynamic rules like “Buy 2, Get 1 Free” or volume tiers visible before cart addition, use custom code or a storefront app.
Method 1 — Use Shopify Compare-at Price
Shopify provides Compare-at Price as a built-in feature to display sale pricing. It changes the product price display directly on your store.
Here is how to set it up:
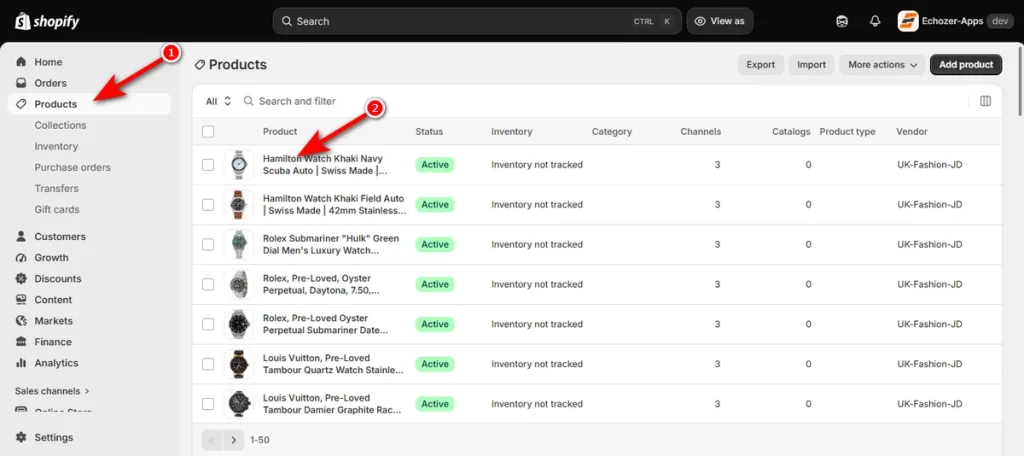
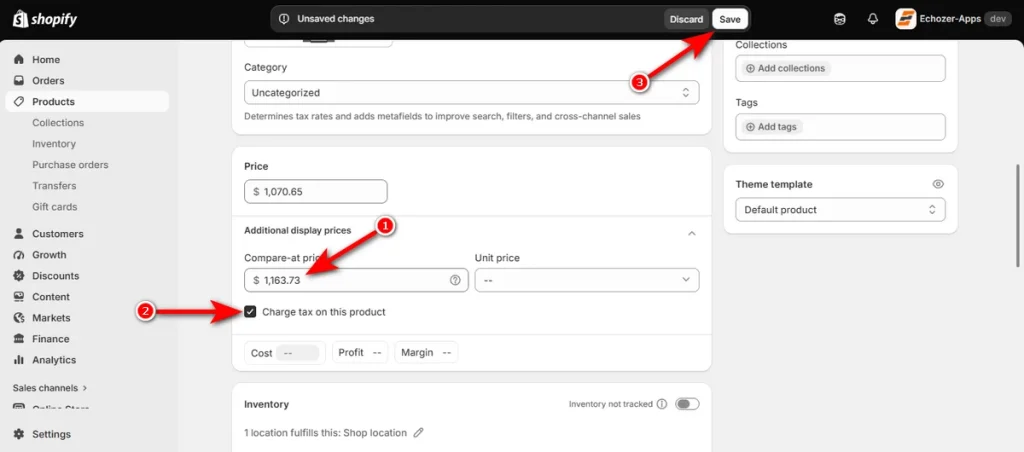
- Open Shopify Admin, click ‘Products,’ and open your item.
- Scroll down to the ‘Price’ area and click the “Compare-at” button.
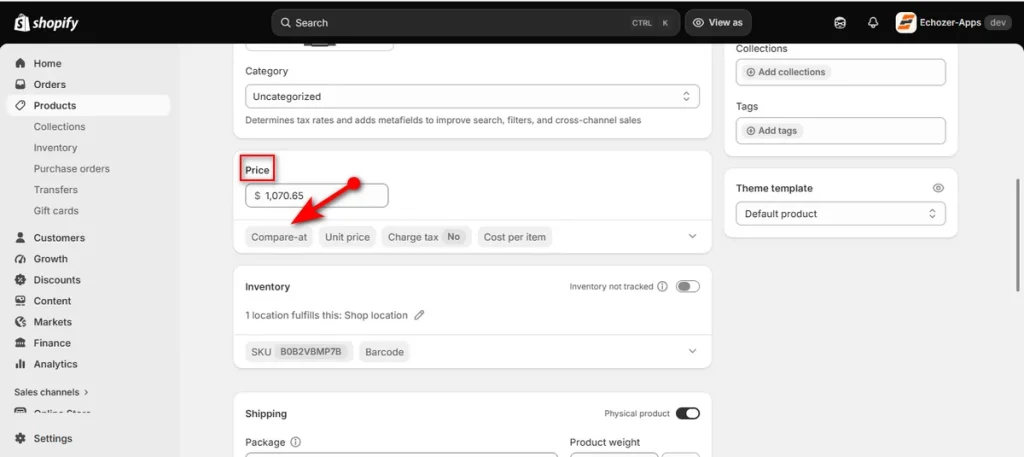
- Type your original price into the “Compare-at price” field. Check “Charge tax on this product” if you collect sales tax. Click ‘Save’ in the top right corner.
Now, visit the product page, and you’ll see strikethrough pricing.
When Compare-at Price Works Best:
- Every visitor gets the same price cut.
- The price drop needs no minimum quantity.
- You want standard strikethrough pricing.
- You do not need rules based on cart totals.
Limitations of Compare-at Price: Compare-at Price changes the base pricing. It can’t handle dynamic discount logic such as:
- Buy 2, get 10% off
- Buy 3, get 20% off
- Buy 2, get 1 free (BOGO)
- Spend $100 and save $15
Shopify’s native system creates a static price update. It lacks the engine required for condition-based promotions.
Method 2 — Use Echo Bundle to Show Discount Offers on the Product Page
Static Compare-at prices fail when discounts scale with item quantities. Buyers must see exact multi-buy tiers before adding items to carts. Echo Bundle solves this display problem. It injects active quantity breaks, volume deals, and promotional widgets directly onto Shopify product pages.
How to Create a Product-Page Discount with Echo Bundle
Follow these steps to set up dynamic discount tiers using the app:
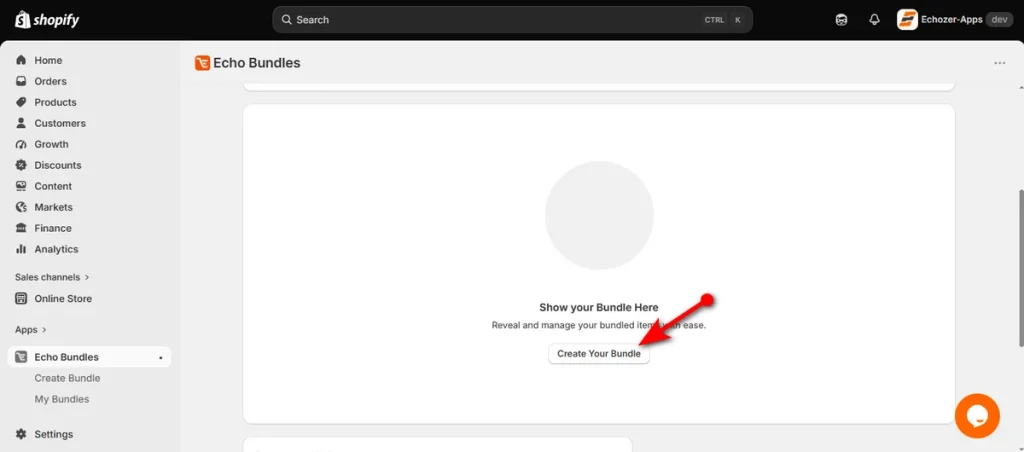
- First, install Echo Bundle and open the app from your Shopify Admin menu. Find the main dashboard, then select the “Create Your Bundle” button.
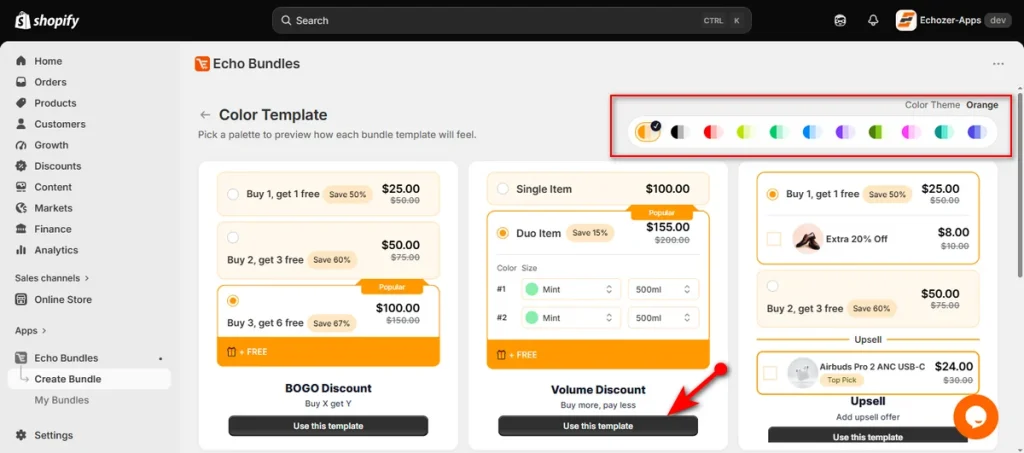
- Pick a palette style from the “Color Theme” options at the top to match your store design. Then, choose a layout template, such as “Volume Discount,” and click “Use this template” button.
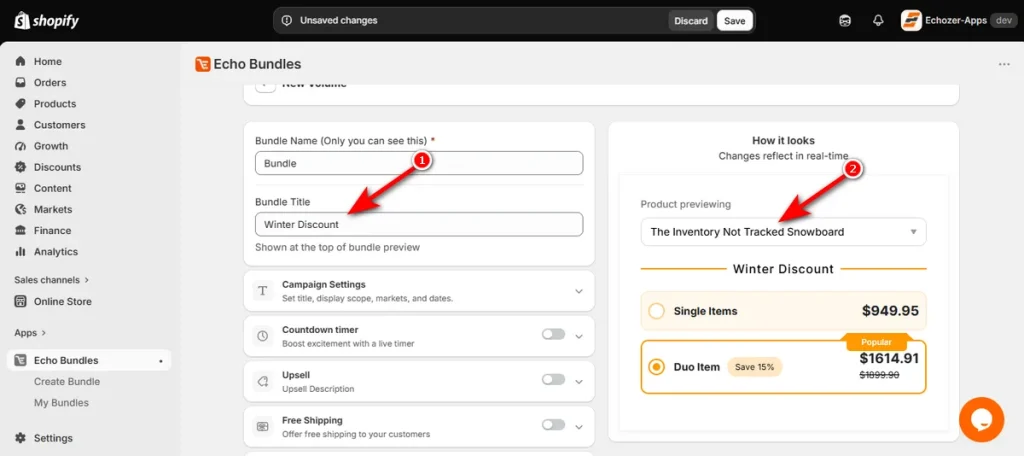
- Type an internal name into the “Bundle Name” field. Write a customer-facing title in the “Bundle Title” box to show above the offer block. Then, select a product using the “Product previewing” dropdown on the right side.
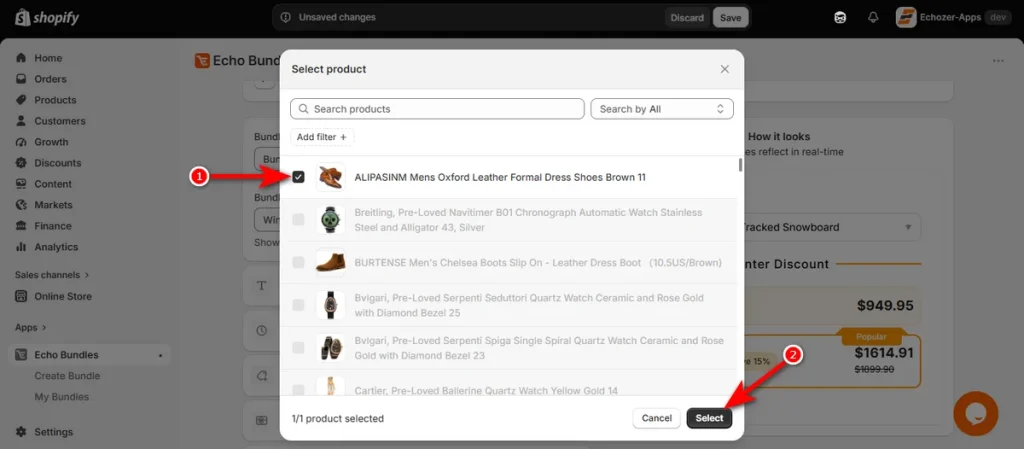
- Check the box next to your desired product in the pop-up catalog window. Click the ‘Select’ button at the bottom right to link it to the campaign.
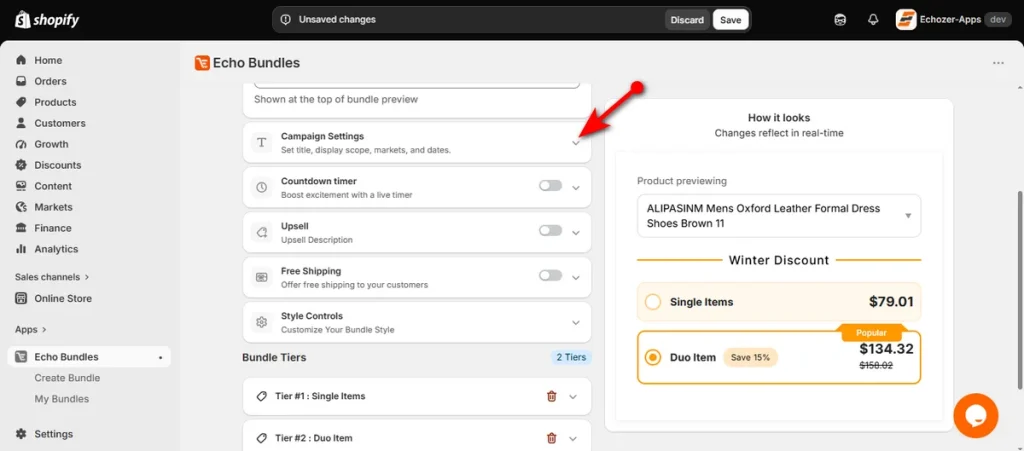
- Click the arrow beside “Campaign Settings” to expand rule options.
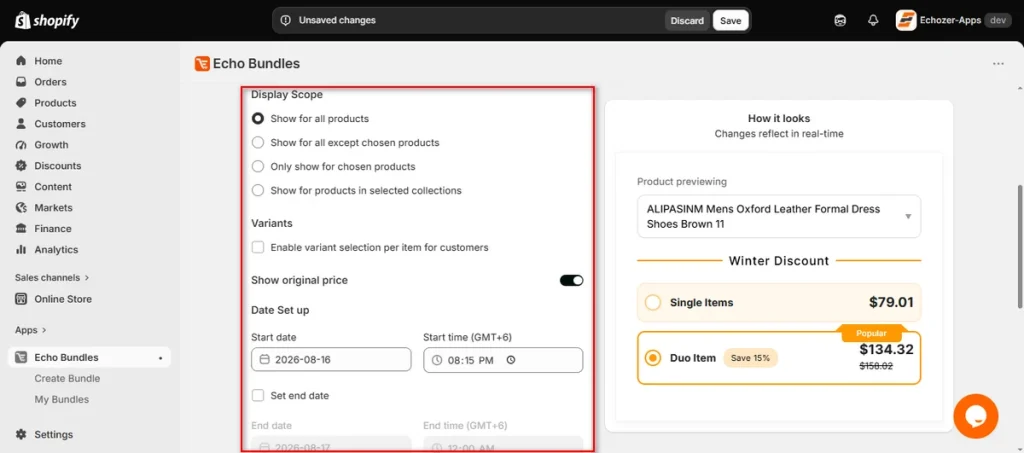
Select a “Display Scope” to choose where the offer appears, such as showing it on all products or specific items. Configure variant permissions and set your active campaign dates.
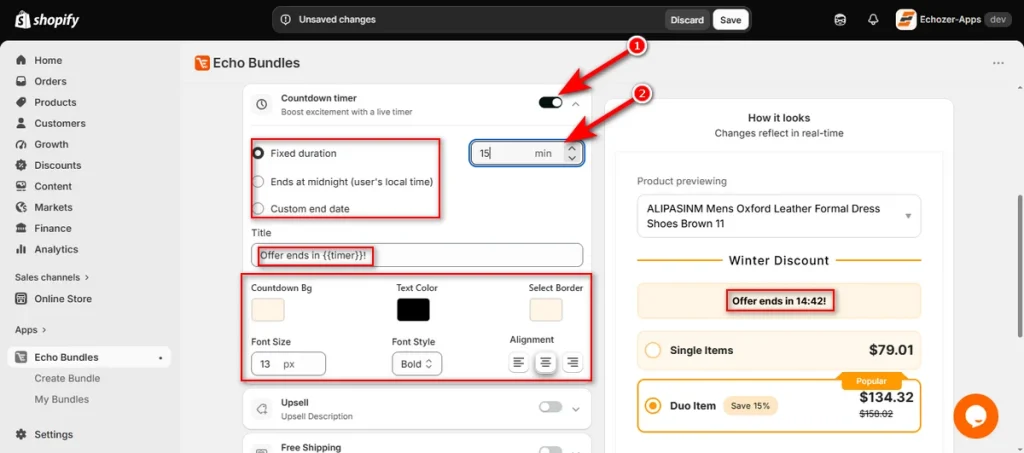
- Toggle on the “Countdown timer” feature to create urgency. Choose a duration type, enter your timer text, and style the background box colors, fonts, and borders.
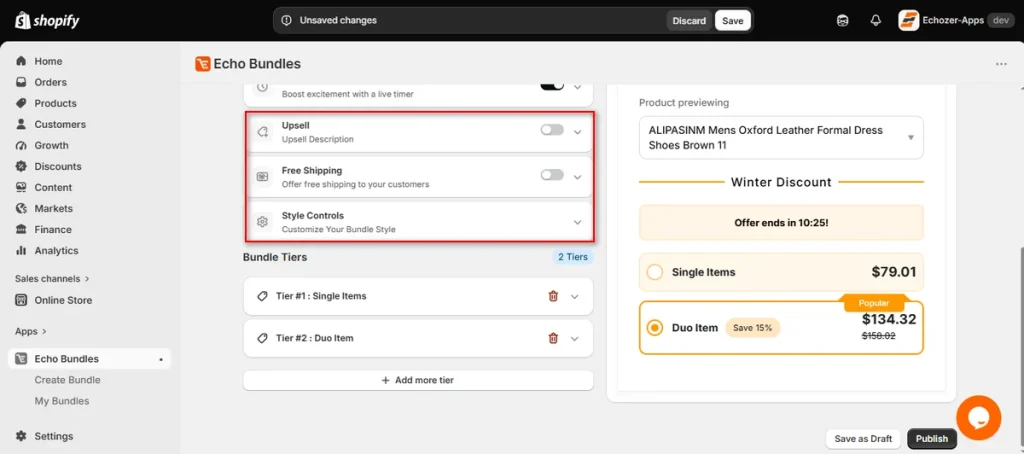
- Expand the ‘Upsell,’ “Free Shipping,” and “Style Controls” panels if you want to bundle extra add-ons or alter visual themes.
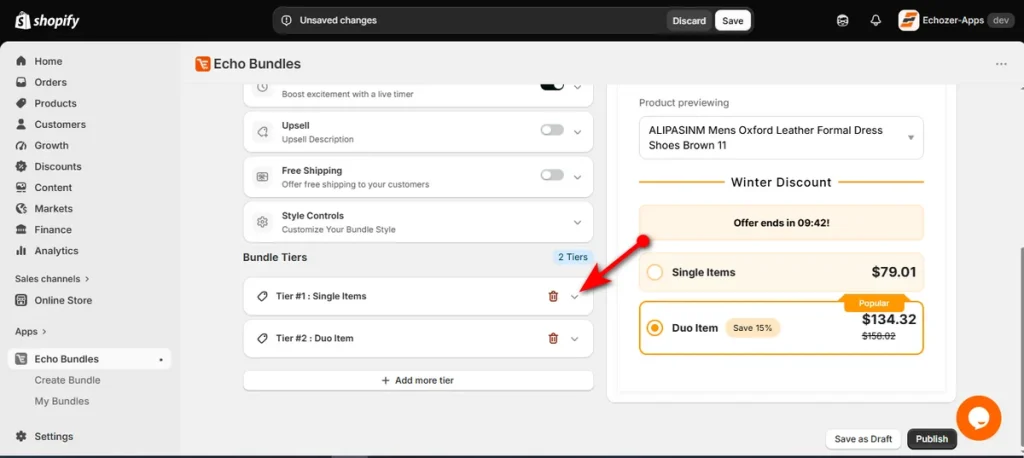
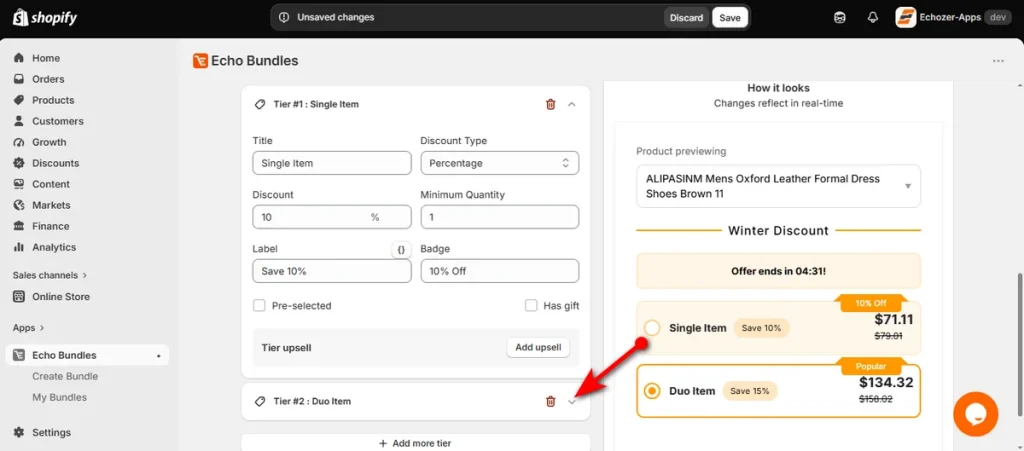
- Scroll down to the “Bundle Tiers” section and open “Tier #1: Single Item.”
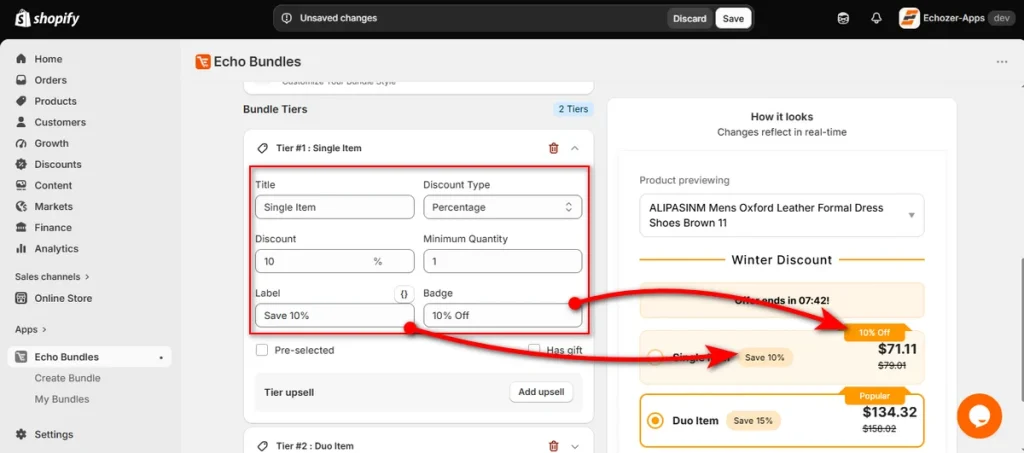
Set the title, choose ‘Percentage’ as the discount type, and type the percentage value with a minimum quantity of one.
Fill out the ‘Label’ and ‘Badge’ boxes so buyers see clear discount tags on the preview.
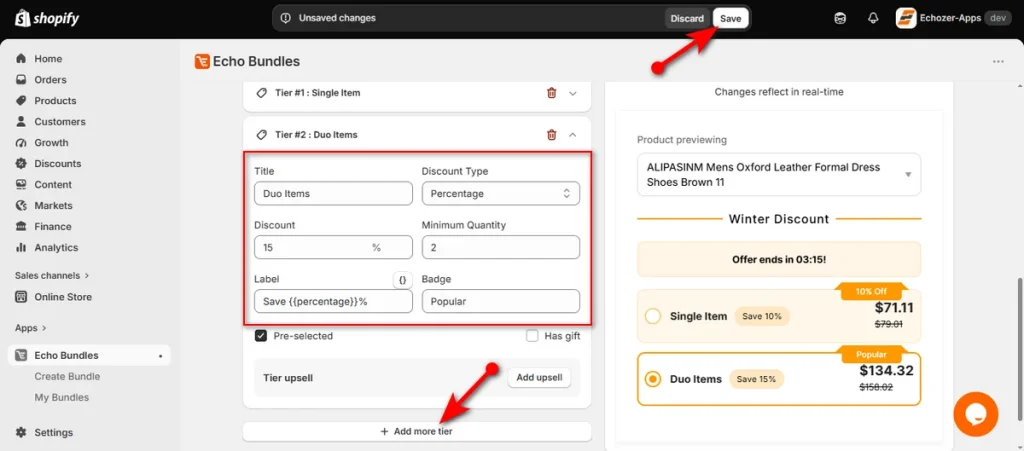
- Open “Tier #2: Duo Item” to configure multi-buy savings.
Set the second tier title, select a percentage discount, and raise the minimum quantity requirement. Click the ‘Save’ button at the top right to publish your changes.
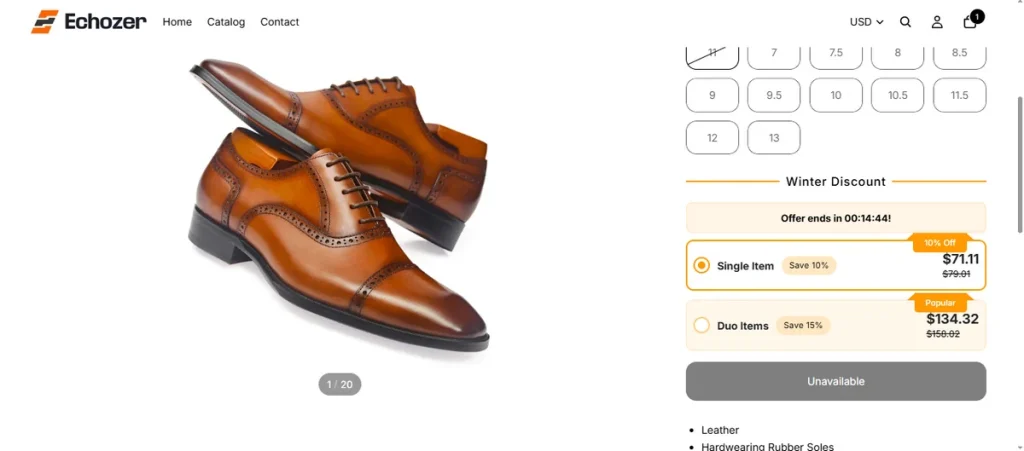
- View your storefront product page. The discount widget displays price tiers and savings badges clearly before customers add anything to the cart.
Method 3 — Add Promotional Text or a Discount Banner
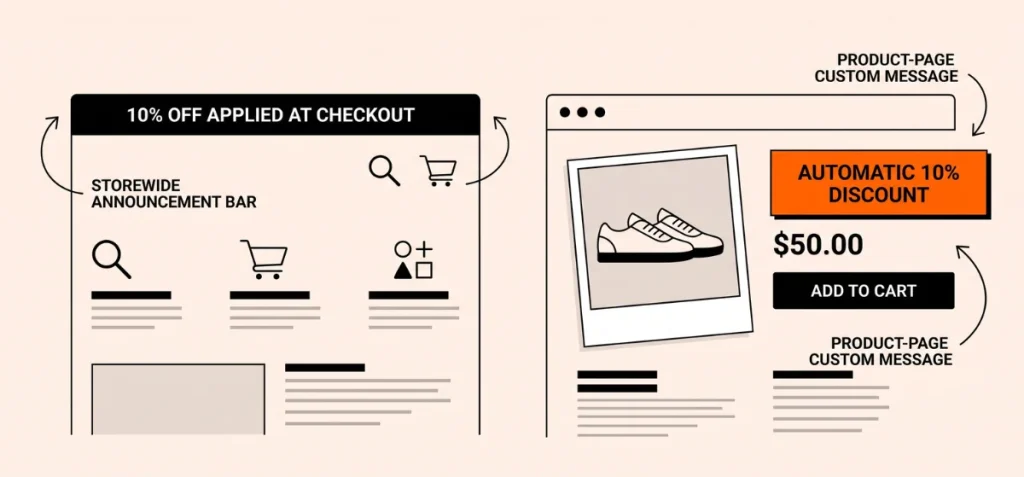
You can use text alerts across your store as a basic workaround. This method alerts visitors about active deals without altering product-page price tags.
1. Storewide Announcement Bar
Place a top banner on your theme to highlight automatic cart rules.
Effective examples:
- “10% off automatically applied at checkout”
- “Buy 2 items and save 10% instantly”
- “Spend $100 or more to save 15%”
2. Product-Page Custom Message
Add a short text line directly near your buy button using Liquid block sections or theme settings. This line explicitly tells shoppers about ongoing deals before they click “Add to Cart.”
The Main Limitation
Promotional banners inform buyers about a sale, but they do not change the product’s listed dollar figure. Customers see the deal alert, but the price tag itself remains static until items reach the cart.
Method 4 — Customize the Shopify Theme
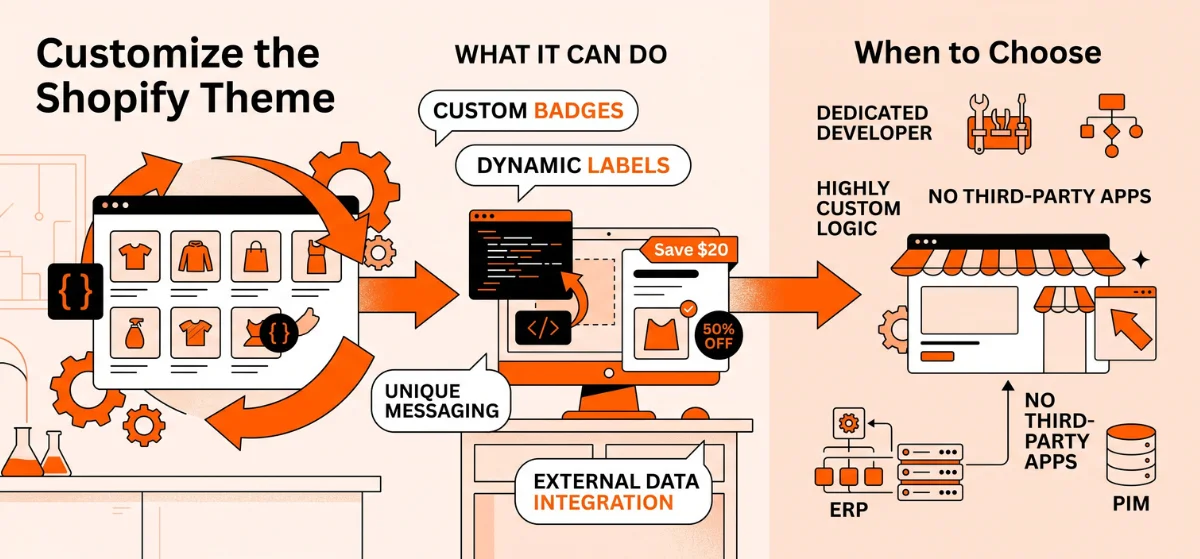
Developers can modify theme files to build custom sale badges and custom display rules directly into the product template.
What Theme Customization Can Do
A developer can edit Liquid files and JavaScript to show:
- Dynamic sale badges (e.g., “Save $20”).
- Calculated percentage labels.
- Custom promotional text near the price tag.
- Unique product-page messaging elements.
When to Choose Custom Code
- Your team includes a dedicated Liquid developer.
- Your storefront needs highly custom layout logic.
- Your store wants to avoid adding third-party apps.
- You are pulling sale pricing data from an external PIM or ERP system instead of standard discount fields.
Shopify Discount Not Showing on Product Page?
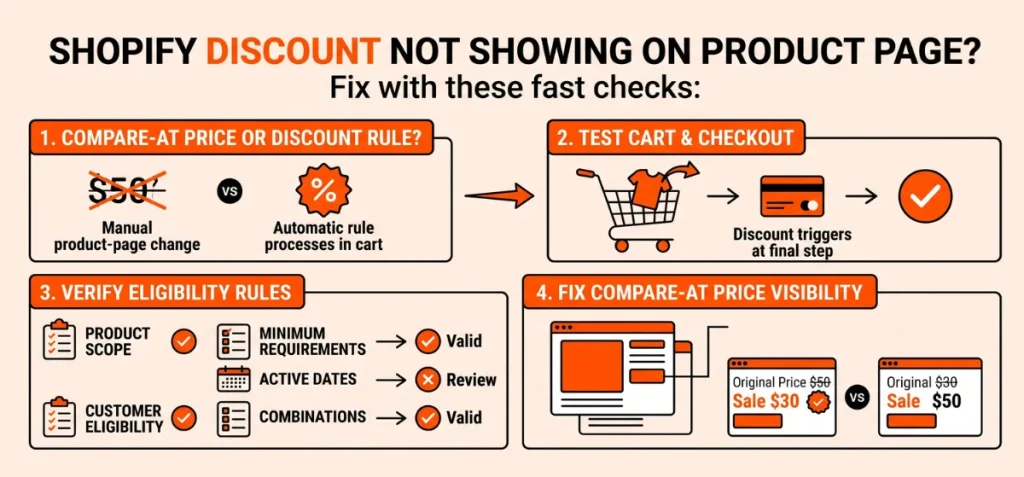
Fix your missing storefront discount using these fast checks.
Check Discount Type vs. Sale Price
Did you create an automatic discount rule under ‘Discounts’ or edit the “Compare-at Price” on the product page?
Automatic discount rules process inside the cart, while compare-at pricing edits the product tag directly.
Test Cart and Checkout Behavior
Add your product to the cart and proceed to checkout. The automatic discount triggers at this step if conditions match. Missing product-page price drops reflect standard Shopify system design, not a broken setup.
Verify Discount Eligibility Rules
Ensure your setup meets every requirement:
- Product Scope: Verify target items sit inside selected collections.
- Minimum Requirements: Check minimum order values or item quantities.
- Customer Eligibility: Confirm rules apply to all buyers or targeted customer groups.
- Active Dates: Check start and end times in your campaign settings.
- Combinations: Ensure discount rules do not conflict with active codes.
Fix Compare-at Price Visibility
If your Compare-at Price fails to show on the storefront, check these settings:
- Price Gap: Make sure the Compare-at Price value is strictly higher than the current Price.
- Theme Template: Themes control sale badge displays. Some custom layouts hide strike-through prices unless specific theme settings are turned on.
Why Compare-at Price May Not Show on Shopify
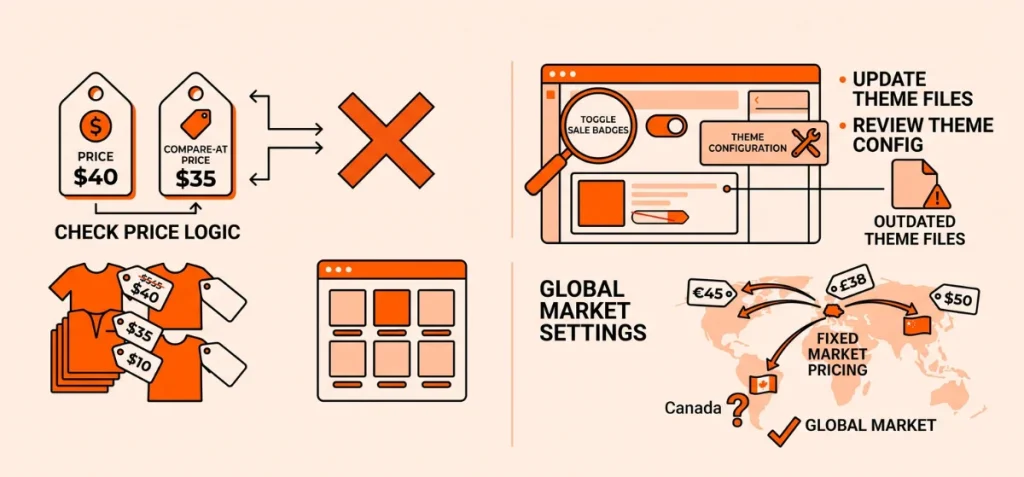
Missing sale tags usually point to setup errors inside your admin panel or theme configuration.
Compare-at Price is Equal to or Lower Than Price
Shopify requires your original price to be higher than your current selling price.
- Price: $40
- Compare-at Price: $35
This setup breaks the sale logic. Shopify hides strikethrough styling whenever the compare-at figure drops below or matches the selling price.
Variant Pricing is Inconsistent
Variant discrepancies block collection-level sale badges.
If one product variant features a Compare-at Price while another leaves it blank, Shopify themes may hide the “On Sale” tag on collection pages to avoid showing incorrect price ranges.
Your Theme Controls Storefront Display
Themes process and display sale data differently. Some store layouts require you to toggle on sale badges inside the theme editor, while outdated or heavily modified Liquid files might lack standard strikethrough price blocks entirely.
Market and Fixed-Price Settings Override Admin Fields
Global selling setups can change local price displays. Shopify Markets allows fixed product pricing per region.
These market-specific price overrides can hide Compare-at pricing on international storefronts even when your main admin prices look correct.
Common Mistakes When Showing Shopify Discounts
Avoid these common operational mistakes when setting up your store promotions:
- Calling Compare-at Price an Automatic Discount: Compare-at Price is a manual price adjustment on a single product.
Automatic discounts rely on dynamic cart rules. Confusing the two leads to incorrect store setups and broken customer expectations. - Showing a Sale Price Before Customer Qualification: Displays showing a flat “$10” tag on a quantity break offer confuse buyers.
Keep single-item prices accurate until the buyer adds required item quantities to qualify. - Overlooking Variant Pricing and Rules: Product variants often carry distinct base prices. Check every variant price before you launch a deal.
Parent product discounts often fail if variant prices contain errors. That creates confusing price mismatches at checkout. - Displaying Savings Without Clear Conditions: Vague text like “20% OFF” frustrates buyers at checkout. Use explicit terms like “Buy 3 or more and save 20%” so buyers understand the exact requirement.
- Publishing Banner Text Without Cart Verification: Promotional banners often get left behind when discount rules change.
Always test your checkout flow after updating banner copy to guarantee listed terms match active cart rules.
Which Method Should You Use?
Okay, you now know how to show automatic discount on product page Shopify setups based on your offer type.
Use Compare-at Price for simple, static sale prices that apply to everyone without apps. Pick Echo Bundle when you need dynamic storefront offers like volume discounts, BOGO deals, bundles, or tiered quantity breaks.
Choose a custom developer build only if your store requires unique calculation logic or custom theme layouts that standard apps can’t handle.
FAQs
How Do I Add an Automatic Discount on Shopify?
Go to Shopify Admin, select ‘Discounts,’ and click “Create discount.” Pick “Automatic discount,” set your eligibility rules and savings, then click ‘Save.’
Why is My Discount Not Showing on Shopify?
Shopify automatic discounts apply inside the cart and checkout. They do not show on product pages natively. Check your minimum quantity rules, active dates, and product eligibility.
How Do I Put a Discount on a Product on Shopify?
Go to ‘Products’ and open your item. Type the higher original price in “Compare-at price” and enter the sale price in ‘Price,’ then click ‘Save.’
How Do I Display a Discount Code on My Shopify Cart Page?
Enable the discount code field in your theme settings under the cart layout options, or use a storefront app to collect discount codes before checkout.